Python Sockets: Connection-oriented sockets
Connection-oriented sockets require an explicit connection setup between two sockets. Once connection is complete, these sockets can send data to each other without specifying the address of the other socket. And as they are already connected, there is no need to specify the address of the receiver socket.
One of the key Internet protocols, TCP (Transmission Control Protocol) uses connection-oriented sockets. TCP provides various important flow-properties. First, if the network drops packets (let us say due to network congestion), then TCP retransmits lost packets. Second, TCP adjusts the sending-rate as the available network bandwidth changes. Third, TCP also takes into account the buffer of the receiving socket and does not overwhelm it.
Server-side steps
For a socket to become a server socket, meaning it can accept newer connections, we need to perform three basic steps after we open a socket: (a) bind the socket to a well-known port, (b) start listening for incoming connections on that port, and (c) accept new connections.
With the bind step, we specify a port number and an address on the local host. When a socket is bound to a well-known port (or a pre-communicated port), then the remote socket knows where to request a new connection.
With the listen step, the socket becomes a listener socket -- this state allows a socket to accept connections from the remote machines. Typically, with a listen call, we can specify the maximum number of backlog of pending connections. The limit is a good measure to avoid Denial-Of-Service attacks. Without this limit, a malicious client can continuously (and at a fast rate) keep sending connection requests and thus, the server can keep creating new pending socket connections. Such attacks can seriously deplete the memory and CPU resources at the server!
With the accept step, Python returns one connection from the list of accepted connections. The TCP listener enqueues new connections, as and when they are established at the TCP-layer. When the application calls accept(), Python dequeues one connection from the list. It is this connection that should do subsequent send/recv operations with the remote socket.
The following figure displays the above steps of socket, bind, listen, accept at the server and socket, and connect at the client. Please note that the steps for client side may happen at the same machine.
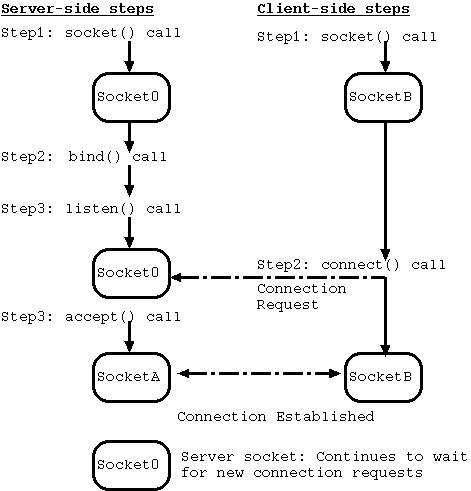
Figure: TCP Connection Steps
We can use an analogy of regular postage mail to better understand these steps on the server-side. The bind step assigns a unique mailing address of a house. This uniqueness allows the post office to deliver all the mails destined to this house correctly. With socket binding, we also assign an address and a port number such that the combination of these two (IP address and port number) is unique in the entire Internet. The listen step means that the owner of the house now says that the address is ready and it can receive mails -- perhaps, by putting a mailbox so that incoming mails can be received! Lastly, the accept call means checking the mail box regularly and taking out received mails.
Now that we are familiar with the basic steps, let us provide a simple implementation of a TCP server and a TCP client.
 import socket

 #Open a TCP server socket.
 socket0 = socket.socket(socket.AF_INET, socket.SOCK_STREAM)
 print(socket0)
 print(type(socket0))

 #Bind the socket to a given port.
 bindAddress = ("", 9999)
 socket0.bind(bindAddress)

 #Listen for incoming connections.
 socket0.listen(5)

 while 1:
     #Accept one connection from the list of incoming connections.
     tupsocketA = socket0.accept()
     socketA = tupsocketA[0]
     print("\nConnection from a client: ")
     print(socketA)
     print(type(socketA))

     #Receive data on the child connection.
     recvData = socketA.recv(100)
     while (recvData):
         print(recvData)
         recvData = socketA.recv(100)

     #Close the child and the server sockets.
     socketA.close()
     socket0.close()

     #Break out of the loop.
     break
Let us walk through the above implementation.
We begin by creating the server socket (socket0) using the socket.socket() call -- this means that we are calling the socket function of the socket module. We pass two parameters to this call: socket.AF_INET and socket.SOCK_STREAM; AF_INET indicates that we are interested in creating an IPv4 socket (for IPv6, we use AF_INET6) and socket.SOCK_STREAM means that we are interested in creating a connection-oriented (also called streaming) protocol. The return value of the socket function is a socket object.
The second call is to bind this socket. Binding takes a tuple which consists of the address (IP address or the name of the server) and a port number. In our case, we use ('',9999) which indicates that the socket0 is now bound to port 9999 on the local machine.
The third call is to make this socket a listener socket. This enables the socket to start accepting new connections from remote clients. We provide the backlog parameter as 5; this means that we drop any new connections if the queue of pending connections grows to 5. Do not worry about the dropped connections -- if the client is genuine, then they would retry since retrying is inbuilt in TCP.
The next call is to issue a new connection, if any. Note that the accept() call returns a tuple that holds the socket of the child connection along with the address of the peer. The address of the peer is a combination of the IP address and the port number of the client.
With this, the server is all set to accept new connections! Once the server accepts a new connection, then it issues a recv() call on the child socket to receive any data. After receiving the data, it closes both the child and the server sockets. We do this just to keep the example simple. Closing a socket is important since this step releases all the resources associated with the socket.
Client-side steps
Next, let us write a simple TCP client -- this socket would be the second endpoint of the network "pipe". Let us first provide the implementation:
 import socket

 #Open a TCP client socket.
 socketB = socket.socket(socket.AF_INET, socket.SOCK_STREAM)
 print(socketB)
 print(type(socketB))

 #Connect the socket to the server socket.
 connectAddress = ("", 9999)
 socketB.connect(connectAddress)

 #Send some data to the server.
 numBytes = socketB.send(b"Hello World")
 print("Sent " + str(numBytes) + " bytes.")

 #Send some more data.
 numBytes = socketB.send(b"101, 280, 237, 680")
 print("Sent " + str(numBytes) + " bytes.")

 #Close the socket.
 socketB.close()
Like the case of server, the client also begins with the socket.socket() step to create a socket. After the socket is created, we issue the connect() step to connect it to the server. The connect() step (very much like the bind step) also takes an address as a tuple -- this time, it is the address of the TCP server. For the sake of simplicity, we create this socket on the same machine as well. If it were to be created on a different machine, the connect step would require the IP address of the box where the listener resides (as in 'connectAddress = ("192.168.100.100", 9999)').
Once connected, we use the send() call to start sending data to the server. We send data as 'b"Hello World"' where the "b" identifier at the beginning means that it is a buffer. Without the "b", this call would fail in Python 3. Since "b" works in both Python 3.x and 2.x, we recommend using it to avoid portability problems. The send() returns the number of bytes sent to the other end.
Note that the send() call does not take any address; as discussed earlier, it works because the sockets are connected. Trying to send data on an unconnected socket of socket.SOCK_STREAM type would lead to an error.
Once the client has sent some data, we use the close() call to close the socket.
It would be important to note that some of these calls are blocking; this means that if we issue them, the Python interpreter would block and no further operation can be done on that. Some of the blocking calls are: accept(), connect(), send(), and recv(). Calls like socket() and bind() are not blocking.
At this point, let us run the server code. Since accept() is a blocking call, this example would block until there is a new incoming connection.
 [user@codingbison]$ python3 tcp-server.py
 <socket.socket object, fd=3, family=2, type=1, proto=0>
 <class 'socket.socket'>
We can easily verify the state of these sockets using the "netstat" tool (or its new variant "ss" tool) on Linux (or MAC OS) machines. If we were to run this tool at this point, then we would find an entry for a TCP socket sitting on port 9999 and with a state of LISTEN. To have a better output, we pass a set of options to netstat: "t" for TCP sockets, "p" for printing associated programs, "l" for printing only listening sockets, and "n" for printing numeric addresses. Also, to access names of programs, we should be logged as a root. The output show tcp-server listening on port 9999.
 [root@codingbison]# netstat -tpln
 Active Internet connections (only servers)
 Proto Recv-Q Send-Q Local Address               Foreign Address             State       PID/Program name
 tcp        0      0 0.0.0.0:9999                0.0.0.0:*                   LISTEN      5553/python3
 tcp        0      0 127.0.0.1:631               0.0.0.0:*                   LISTEN      896/cupsd
 tcp        0      0 127.0.0.1:25                0.0.0.0:*                   LISTEN      5506/sendmail
 tcp        0      0 :::80                       :::*                        LISTEN      1015/httpd
 tcp        0      0 :::631                      :::*                        LISTEN      1/init
 [root@codingbison]#
Now that we know that the server is listening on port 9999, let us run the client on a second terminal:
 [user@codingbison]$ python3 tcp-client.py
 <socket.socket object, fd=3, family=2, type=1, proto=0>
 <class 'socket.socket'>
 Sent 11 bytes.
 Sent 18 bytes.
 [user@codingbison]$
And at this point, we see that the server code on the first terminal has additional information. This is because when we run the "tcp-client.py", it issues a connection and that call creates a new connection at the server, which means that the accept becomes successful and hence, it returns.
 [user@codingbison]$ python3 tcp-server.py
 <socket.socket object, fd=3, family=2, type=1, proto=0>
 <class 'socket.socket'>

 Connection from a client:
 (<socket.socket object, fd=4, family=2, type=1, proto=0>, ('127.0.0.1', 33071))
 <socket.socket object, fd=4, family=2, type=1, proto=0>
 <class 'socket.socket'>
 b'Hello World'
 b'101, 280, 237, 680'
 [user@codingbison]$
As noted earlier, the accept call returns a tuple (tupSocketA) which is (socketA, address). The first element in the tuple is the socket of the new connection and the second element is another tuple ("('127.0.0.1', 33071)") that holds the address from where the connection was made. Since the connection is local, we see the address of the loopback ("127.0.0.1") and we see the port number as 33071. Thus, the socket "pipe" consists of two endpoints both sitting on the same machine -- one endpoint sits on port 9999 and the other on the port 33071.
Note that a recv() call is blocking and so unless there is some incoming data, it will remain blocked. This means that the other side needs to do a send() call. Also, the recv() call returns the actual bytes received from the peer and not the number of bytes.
When the peer closes the connection, then the recv() call returns an empty string, which indicates that the other endpoint has closed the connection and hence there is nothing to read. And when this happens the recvData becomes empty and we exit the "while (recvData):" loop in the "tcp-server.py" example.
Non-blocking Sockets
By default, sockets are blocking which means that some of the calls will block until there is something to return. As we have seen earlier, these blocking calls are: accept(), connect(), send(), and recv().
Thus, an accept() call would block until there is one incoming connection and at that point, accept() call will return the tuple consisting of the child socket along with its address. Next, the connect() call would block until the underlying TCP has setup the connection. Likewise, send() will block until the lower layer has received the data (it has space to receive the data). Lastly, the recv() call would block until there is some data to be read and at that point, this call would return the bytes received.
Calls like socket(), bind(), listen(), and close() are not blocking and they return immediately.
However, sometimes we need to make the blocking calls non-blocking. For example, if there is no data to be read, then it should return immediately and we can issue recv() call later.
We can make calls non-blocking using the setblocking() method to toggle blocking/non-blocking behavior of sockets. Setting socketB.setblocking(0) means that the socket (socketB) would become unblocking. With that, the blocking calls (like recv()) would return immediately. On the other hand, setting socketB.setblocking(1) would set the blocking calls to blocking again.
Let us see an example, where the client connects to a server and then does a non-blocking recv().
 >>> socketB = socket.socket(socket.AF_INET, socket.SOCK_STREAM)
 >>>
 >>> connectAddress = ("", 9999)
 >>> socketB.connect(connectAddress)
 >>>
 >>> socketB.setblocking(0)
 >>>
 >>> recvData = socketB.recv(100)
 Traceback (most recent call last):
   File "<stdin>", line 1, in <module>
 socket.error: [Errno 11] Resource temporarily unavailable
 >>>
The error, "Resource temporarily unavailable" is a valid error in this case and should be trapped if we wish to work with non-blocking sockets. This error simply means that there is nothing to read. If there were any data to be read, then the recv() call would have returned normally as we saw in the previous example with "tcp-server.py"
When we have multiple calls, we can use select() to make programs more efficient. We refer the reader to Python docs for more information on both non-blocking behavior and select(): http://docs.python.org/library/socket.html